How to Clean a Shotgun: A Step-by-Step Guide
Proper maintenance of your shotgun is essential for ensuring safety, reliability, and longevity. Regular cleaning prevents residue build-up, rust, and wear, keeping your firearm in top condition. This guide outlines the tools you’ll need and provides a step-by-step process for cleaning your shotgun effectively.
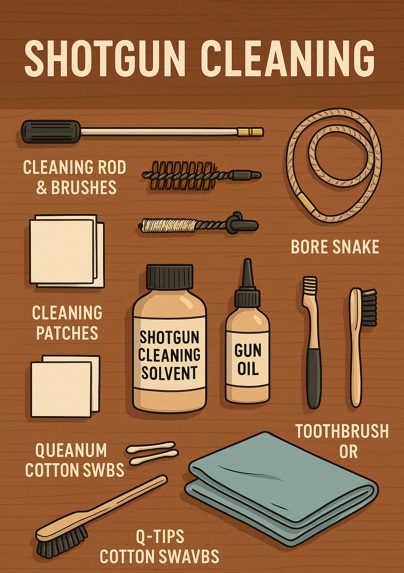
Tools and Materials You’ll Need
- Cleaning Rod and Brushes: Select a cleaning rod compatible with your shotgun’s bore size and include bronze or nylon brushes for removing fouling.
- Bore Snake: A convenient alternative for quick cleaning.
- Cleaning Patches: Lint-free patches for applying and removing cleaning solvents.
- Shotgun Cleaning Solvent: Designed to break down carbon, lead, and powder residue.
- Gun Oil: Protects metal surfaces from rust and ensures smooth operation.
- Microfibre Cloth: For wiping down the exterior.
- Toothbrush or Nylon Brush: Useful for cleaning small components.
- Q-Tips or Cotton Swabs: For hard-to-reach areas.
- Rubber Gloves (Optional): To protect your hands from solvents and oils.
Safety First
Before cleaning your shotgun:
- Unload Your Shotgun: Double-check that the chamber and magazine are empty. Physically and visually inspect the firearm to ensure it is safe.
- Work in a Well-Ventilated Area: Cleaning solvents can produce fumes, so ensure proper ventilation.
- Prepare Your Workspace: Lay down a mat or towel to protect surfaces and keep parts organised.
Step-by-Step Cleaning Process
Step 1: Disassemble the Shotgun
Refer to your shotgun’s manual for specific disassembly instructions. Typically, this involves:
- Removing the barrel.
- Taking out the fore-end and magazine cap.
- Separating the bolt assembly (if necessary).
Keep small parts like pins and springs in a safe place.
Step 2: Clean the Barrel
- Attach the Brush to the Cleaning Rod:
- Apply cleaning solvent to the brush.
- Run the Brush Through the Barrel:
- Push the brush from the chamber end to the muzzle. Avoid reversing direction mid-barrel to prevent damage.
- Repeat several times to loosen fouling.
- Switch to Cleaning Patches:
- Attach a patch to the rod and push it through the barrel to remove residue.
- Replace patches until they come out clean.
- Use a Bore Snake (Optional):
- Apply solvent to the bore snake and pull it through the barrel for quick cleaning.
Step 3: Clean Other Components
- Fore-End and Receiver:
- Wipe down with a solvent-dampened cloth or patch to remove dirt and powder residue.
- Bolt Assembly:
- Use a toothbrush or nylon brush to clean crevices.
- Apply a light coat of oil after cleaning.
- Choke Tubes:
- Unscrew and clean with solvent.
- Apply a thin layer of choke grease before reinstalling to prevent seizing.
Step 4: Lubricate the Shotgun
- Apply Gun Oil to Moving Parts:
- Focus on the bolt, action bars, and trigger assembly.
- Use a small amount—excess oil can attract dirt.
- Protect the Barrel:
- Run a lightly oiled patch through the barrel to prevent rust.
Step 5: Reassemble the Shotgun
- Follow your manual’s instructions to reassemble the parts.
- Perform a function check to ensure everything operates smoothly.
Step 6: Wipe Down the Exterior
- Use a microfibre cloth with a small amount of oil to wipe the shotgun’s exterior, protecting it from moisture and fingerprints.
Additional Tips for Shotgun Maintenance
- Clean After Every Use: Even if you’ve fired only a few rounds, cleaning prevents residue build-up and corrosion.
- Inspect for Wear: During cleaning, check for any signs of wear, cracks, or damage.
- Store Properly: Keep your shotgun in a secure, dry place with a dehumidifier or silica gel to protect against moisture.
- Periodic Deep Cleaning: Perform a thorough cleaning of all components every few months or after extended use.